🏠
Section 1.

Help! My Sprite Gets Stuck!

Up to now we have used a simple square to code our game.
This section explains why we did this.
Choosing a sprite with a more complicated shape results in a difficult problem.
In the examples below I use the penguin sprite to show you what happens.
And how to fix it!

When we use a sprite that is a very simple shape then our platform code will work. However, if your sprite is a person (or an animal) with arms and legs sticking out then you will find that sometimes your sprite gets stuck. Anything with bits sticking out will have the same problem. Almost all of the sprites have bits sticking out.

This is why it happens:

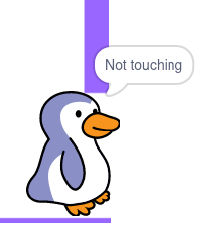
Suppose you just moved right and the sprite has stopped at an obstacle.
Our code ensures that it is NOT touching the obstacle.
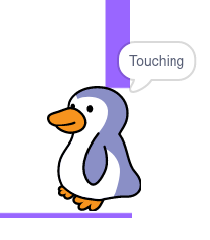
Then you switch its costume to face the other way.
Something sticking out could now overlap the obstacle.
If it overlaps by more than one step the sprite is stuck.
This is because when we try to move the sprite the code will first take one step.
Then it will notice that it is touching an obstacle and will reverse that step.
So now, we are back where we started.

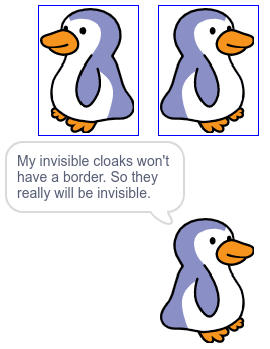
The pictures on the right show that this has happened to the penguin. He is too tall to fit through the gap when he moves to the right. So he stops at the obstacle. When he turns round he overlaps the obstacle and gets stuck.

The easiest solution would be that our sprite's costumes are a really simple shape with nothing sticking out. If you chose a really simple sprite, like a ball, then this would be true. For most sprites, with more complicated shapes, it won't be true. So we have to fix it!

Section 2.

Opacity to the Rescue

The key to solving the problem is called 'opacity'.
You may not know this word.
What it means is quite simple.

There are some things that you can see through.
An example is a window.
Things you can see through are called 'transparent'.

Most things are not transparent.
Somthing that you can't see through is called 'opaque'.

Some things let some light through but are not completely transparent.
Bathroom windows are often like this.
If you have ever used tracing paper then that is like it too.

In Scratch, how much, or little, you can see through something is called its opacity.
If this is set to 0 then it is completely transparent.
If it is set to 100 it is completely opaque.
If it is an in between number, well, it's in between!

Section 3.

An Invisible Cloak

We are going to fix the problem by giving our sprite an invisible cloak.
Every costume that it has will have a square around it.
We will make the square (almost) invisible by setting its opacity to 5.
(Any number smaller than 10 will do, it doesn't have to be exactly 5).

We have a choice:

On the right is an example of a character that I drew inside a square.
And a costume from a sprite called Ben.
The pictures were taken from the costume editor.
You can just about see their cloaks.
In the game, when they are small and there is a background,
you can't see them.

p.s. On this page I sometimes say the invisible cloak is square
and sometimes that it is a rectangle.
You can use either, a square or a rectangle, whichever fits better.

Section 4.

First, let's understand the main steps in the plan.
Then I will give you detailed instructions on how to do each step.
Here is the plan:

  1. Surround your sprite's costume with a rectangle.
  2. Change the rectangle's opacity to a number between 5 and 10.
  3. Make sure that the rectangle's border is set to a width of 0.

The scratch "touching?" block will know the rectangles are there.
Now the sprite doesn't have any bits sticking out.
So, although the rectangle is invisible, it will fix the bug.
Our spite costume has an invisible cloak!

Section 5.

How to do each step:

Surround a costume with a rectangle. At first your rectangle will be coloured and will cover up your sprite. Make sure that the rectangle is selected. (Click on it with the mouse) Use the 'Backward' button at the top of the costume tab. Keep clicking it until the button goes faded and nothing is happening when you click on it. Now the square is behind your sprite, just where it should be.

Adjust your rectangle so that it is a tight fit around the sprite.

The next two steps need to be done with the rectangle selected.

On the right of the Fill and Outline controls is a number.
This is the width of the border around the rectangle.
Set it to 0.

Click on the Fill control.
Ignore the Color, Saturation and Brightness values, it doesn't matter what these are. Set Opacity to a number between 5 and 10.

Now, unselect the rectangle. You unselect things by clicking somewhere else. Or, you can unselect something by pressing the 'Esc' (Escape) key.

Section 6.

We now need to centre the rectangle.

If you click on the rectangle and hold the mouse button down
you can move the rectangle. Keep holding the button down.

You will see a cross in the middle of the rectangle.
There is also a circle, with a cross inside it, in the middle of the sprite.

You need to move the rectangle so that its cross
is right on top of the sprite's cross.

It can happen that the rectangle is already in the right place. So you see the crosses in the picture after you have moved it. Then all you need to do is to move it back!

Make sure that you unselect the rectangle before going on to the next step.

Section 7.

At the moment we just have one costume with a cloak around it.
Usually that costume will look to the right side of the stage.
It isn't a problem if your sprite's costume faces left.

Whichever way round it faces, we need the same costume
but facing the other way.
This is so that our sprite can look to the right when it is moving right.
And it can look to the left when it is moving left.

We want that both costumes have the same invisible cloak.
There is a very simple way to do this.
It is described on this page:
Flipping Costumes
So we just have a small amount of work to do and our
platform game can have a sprite that faces the right way
when it moves and doesn't get stuck.

🏠